Before You Begin#
Updating NS records can take a considerable amount of time. For the fastest setup, we recommend setting the node’s IP in the A records at your registrar IN ADVANCE.
For example, you have a backend (tracker) with IP xx.xx.xx.xx and you rented a node VPS with IP yy.yy.yy.yy. In that case, the A record should contain IP yy.yy.yy.yy, and the domain properties should have backend xx.xx.xx.xx.
Overview#
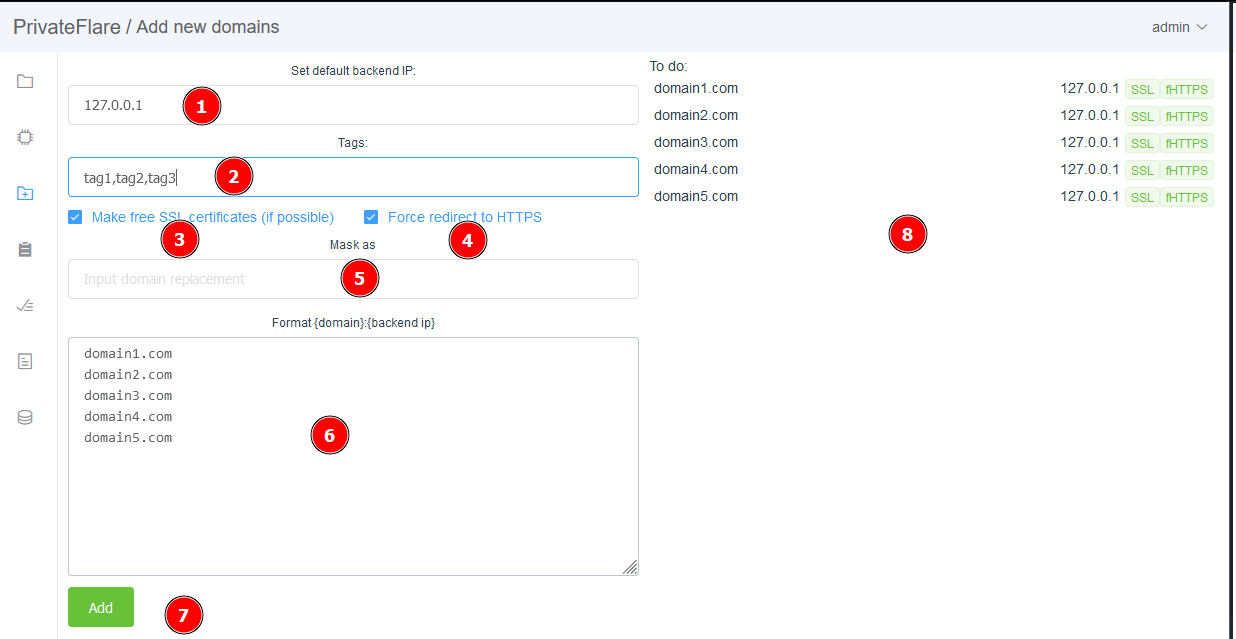
Backend IP address (web server, AlterCPA, Binom, Keitaro, etc.)
Comma-separated list of tags
Generate certificates (when possible)
Enable automatic redirect from HTTP to HTTPS
Domain masking — more on this below
List of your domains to add
Add button
Task preview
Backend IP Address#
Enter the IP address of the server you want to hide. This could be a web server, AlterCPA, Binom, Keitaro, etc.
Comma-Separated Tag List#
Tags are useful for separating domains by purpose, team member, media buyer, or any other attribute. The domain list supports filtering by these tags.
Generate Certificates (When Possible)#
Whether certificates are needed. They are not always needed by everyone — we can simply put domains behind the proxy without certificates. But more often than not, they are needed.
Enable Automatic Redirect from HTTP to HTTPS#
Whether to activate automatic redirect to the secure version of the site. Relevant for all advertising networks. Enabled by default, and this works for 99% of users.
Domain Masking#
Masking is the on-the-fly domain substitution when proxying a request to the backend. The backend sees only one domain, even though traffic comes from dozens or hundreds of different ones.
When Is This Needed#
- Your tracker/CMS is configured for one domain, but you drive traffic through many domains
- You want to hide the connection between domains — each domain behaves as an independent site, but on the backend everything is processed through one
- You need to quickly rotate domains without any changes on the backend side
How to Configure#
In the domain addition form, enter in the Mask field the domain that is configured on your backend. For example, if your server is configured for mysite.com and you drive traffic through domain1.com, domain2.com, domain3.com — set the mask to mysite.com for all three.
How It Works#
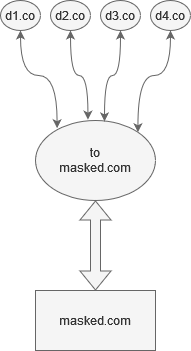
- A visitor goes to
domain1.com - The request reaches the PrivateFlare node
- The node substitutes the domain in the request:
domain1.com→mysite.com - The request goes to the backend as if it came to
mysite.com - The backend processes the request and responds
- The node substitutes back:
mysite.com→domain1.com - The visitor receives a response from
domain1.com
The backend knows nothing about the real domain. The visitor notices nothing. Substitution occurs both in request headers and in the response body — all links and resources are automatically replaced.
Practical Example#
An affiliate team drives traffic through 200 domains in an advertising network. The server runs Keitaro, configured for a single domain tracker.team. In PrivateFlare, all 200 domains are added with the mask tracker.team. Domains can be freely changed, blocked, or new ones added — nothing needs to be touched on Keitaro.
Important: masking replaces the domain not only in the
Hostheader, but also throughout the entire response body. If your site’s HTML contains absolute links to the mask domain — they will be automatically replaced with the visitor’s actual domain.
Domain List#
The list of domains to add — one per line. You can see how they will be added in the right part of the form — in preview 8.
Add Button#
Starts the process.
Task Preview#
A preview of how domains will be added: settings, checkboxes, masking.
Domain Protection Settings#
After adding a domain, the following options are available in its settings (the “Protection” tab):
Security Level#
Determines how the node checks visitors before granting them access to the site:
| Level | What the visitor sees |
|---|---|
| Off | Nothing, passes through immediately |
| Low | Confirmation button |
| Medium | Short pause ~0.5 sec |
| High | Noticeable pause ~5 sec |
| Paranoid | Long pause ~60 sec |
| Auto | Nothing under normal traffic. During an attack — protection turns on automatically and scales in proportion to the load |
After passing the check, a cookie is set for 24 hours — subsequent visits proceed without delays. The check page is generated uniquely for each IP: random element IDs, CSS classes, form URL, invisible traps for bots.
Recommendation: Auto for most domains.
Basic Protection (WAF)#
A built-in set of filtering rules: blocks SQL injections, XSS, vulnerability scanning, path traversal, dotfiles, and other common attacks. Works independently of the security level.
Slow Client Protection#
Enabled by default. Terminates connections with abnormally low data transfer speed (slowloris, slow POST/READ attacks). Real users, even on a slow internet connection, are not affected by this limit.
Max Body Size#
Maximum size of an incoming request body in MB. Anything larger gets a 413 and never reaches the backend. 0 = no limit.
Bandwidth Limit#
Content delivery speed limit for a domain in KB/s. A value of 0 means no limits. Useful for controlling traffic costs and preventing abuse.
TLS Fingerprint#
A TLSFingerprint header is automatically added to every HTTPS request to the backend. It is a unique fingerprint of the client’s TLS connection — it allows you to tell a real browser from a bot by User-Agent.
Node Binding#
By default, every domain is accessible through all your nodes simultaneously. This means a visitor can access your domain through any node, and the request will be handled correctly.
If you need to restrict this, select specific nodes in the domain settings. The domain will only work through the specified nodes; the rest will ignore it.
This is useful for teams: each media buyer or project works through their own set of nodes, and one person’s problems do not affect the others. It also helps with IP isolation — domains on different nodes are not linked to each other from an external observer’s perspective.
Geo-filtering#
Access restriction based on visitor geography. Three modes:
- Disabled — access from all countries
- Allow only — only selected countries
- Block — block selected countries